MIPI Camera
Copyright © Quectel Wireless Solutions Co., Ltd. 2026. All rights reserved.
This document describes in detail how to identify and connect the MIPI CSI camera interfaces on the Quectel Pi M1/L1 smart main control board. It also provides functional usage guidance and troubleshooting solutions for common issues.
Supported Accessories
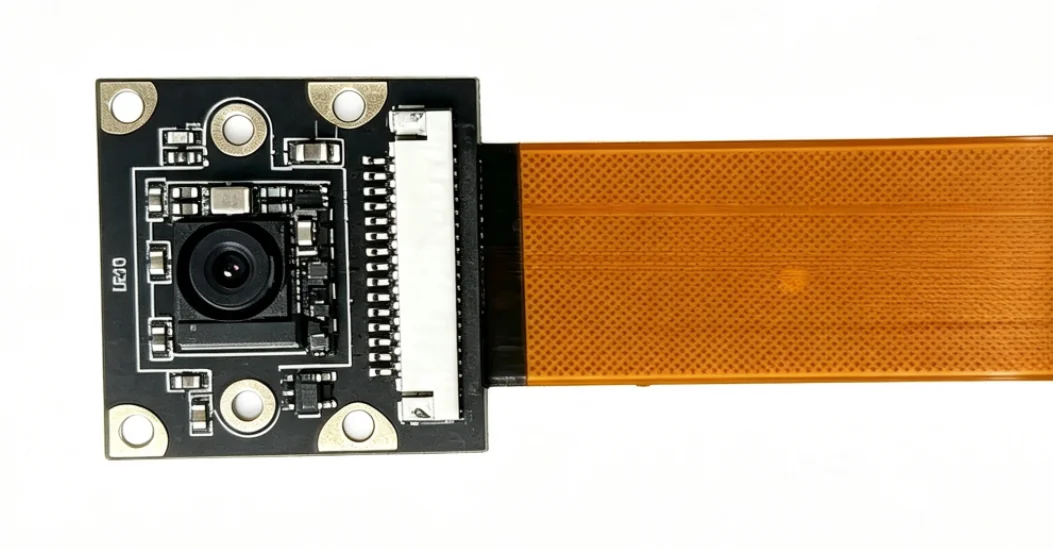
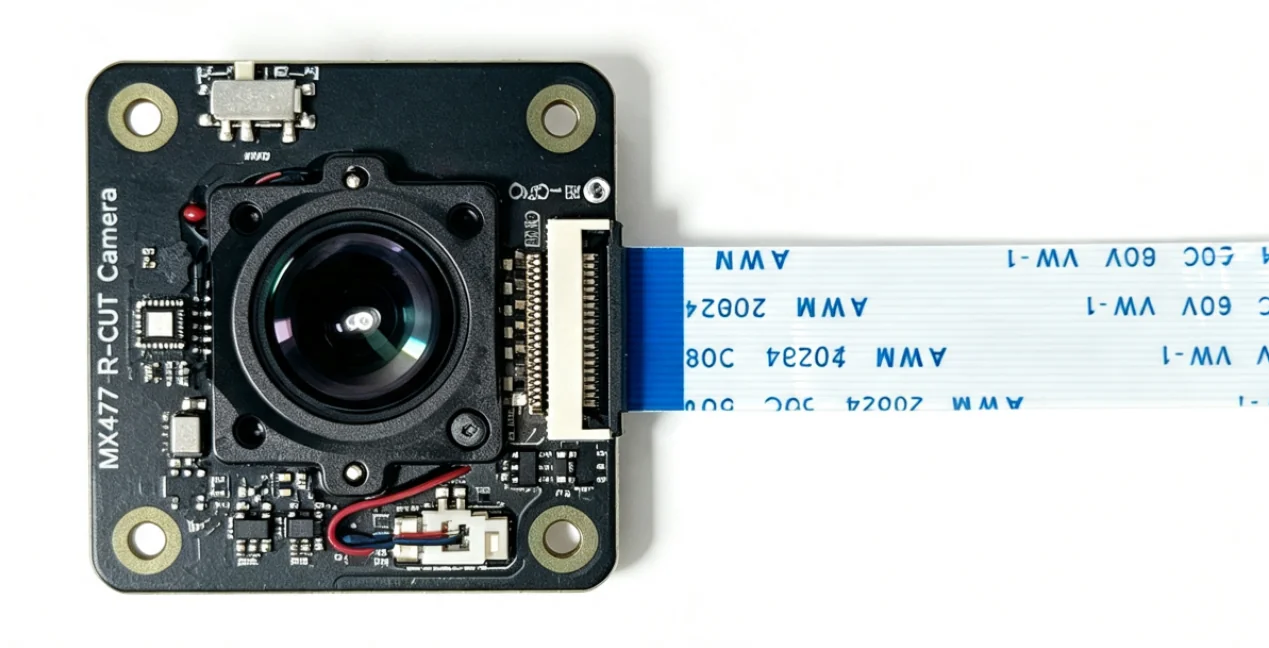
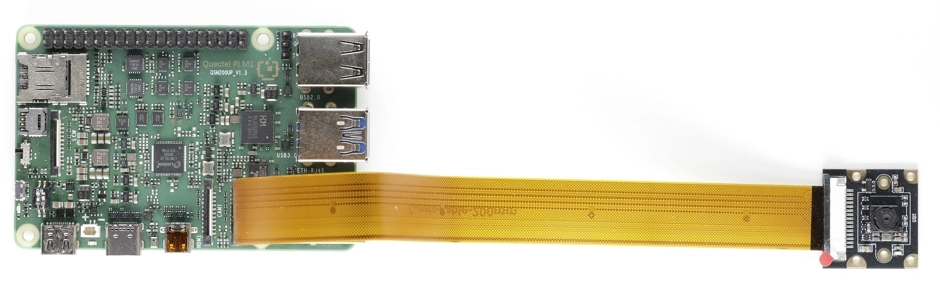
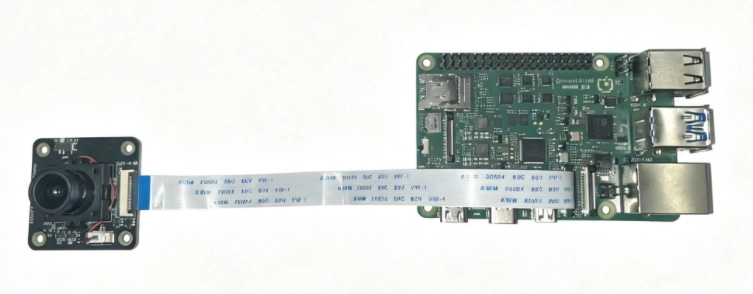
The FPC ribbon cable of the original accessory is not connected to the camera by default and must be connected manually. When connecting it, make sure the gold fingers of the ribbon cable face the metal contact surface inside the board connector, meaning the gold-finger side faces downward. Avoid incorrect cable insertion, as this may damage the camera. After connecting the ribbon cable, the camera appears as shown below:
IMX 219:
IMX 477:
Hardware Interface
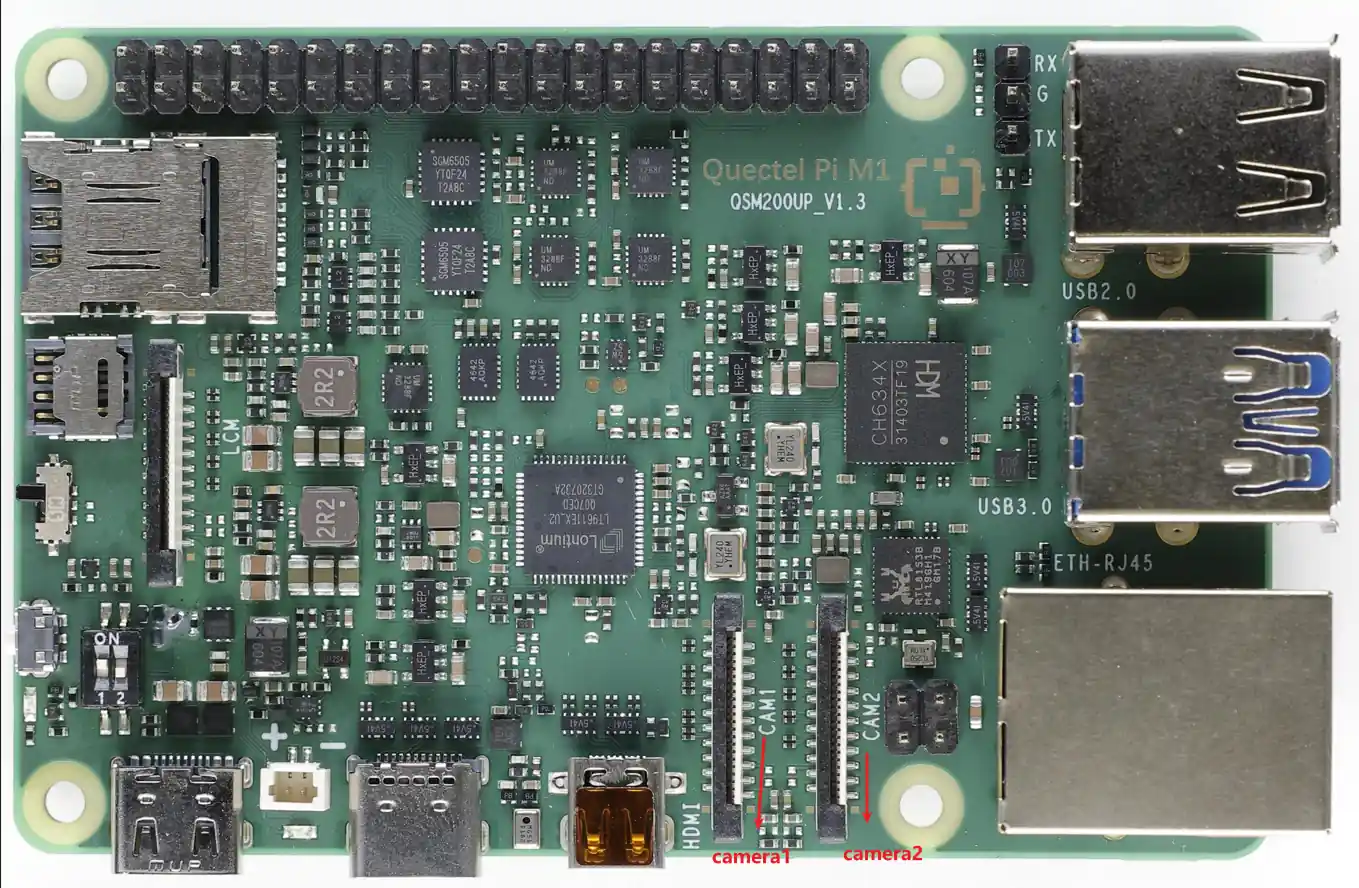
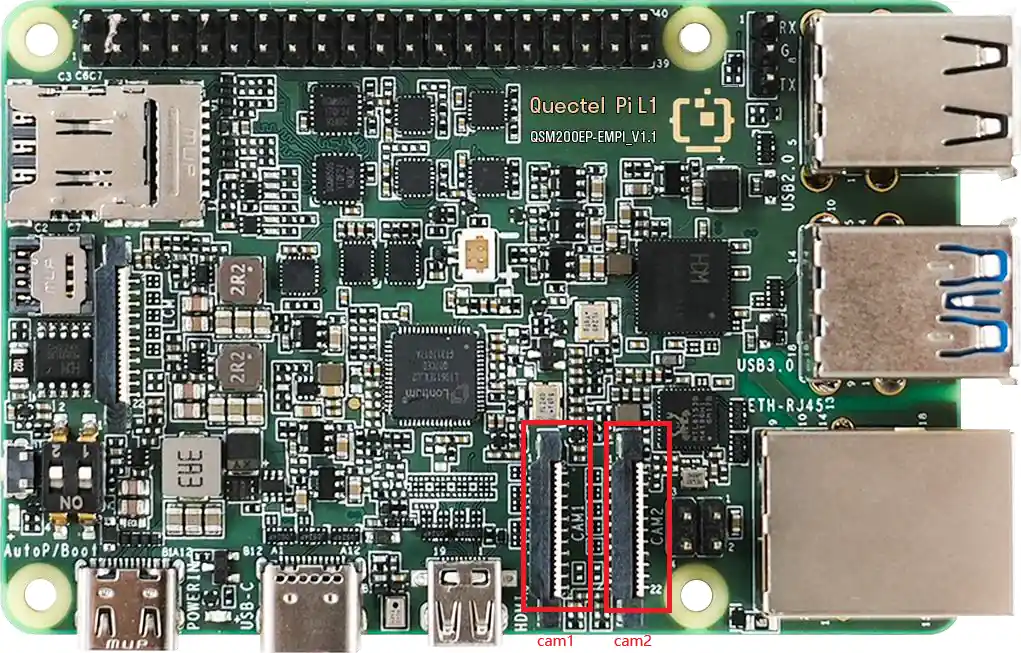
The Quectel Pi M1/L1 smart main control board supports two MIPI CSI camera interfaces. The interface locations and labels are shown below:
M1 camera interface:
L1 camera interface:
Quick Start
Connect the camera as shown below. The two supported camera accessories can be connected to camera1/camera2 as needed. When connecting, lift the black latch of the connector, insert the FPC ribbon cable into the CSI slot, and make sure the cable’s gold fingers face the metal contact surface inside the board connector (the white side). Press the latch down and confirm that the FPC ribbon cable is secure and not loose. M1 is used as an example below to show the connection methods for the IMX 219 and IMX 477 cameras. The L1 connection method is the same.
Refer to Display Configuration to connect the display.
M1 Functional Usage (GNOME)
Prerequisites:
Before using the camera function, enter the following commands in the terminal:
bash

a=`find /run/user -maxdepth 2 -name 'wayland-?' 2>/dev/null`;
export XDG_RUNTIME_DIR=`dirname $a`
export WAYLAND_DISPLAY=`basename $a`
export LD_PRELOAD=/opt/qcom/lib/libgbm.so:$LD_PRELOAD
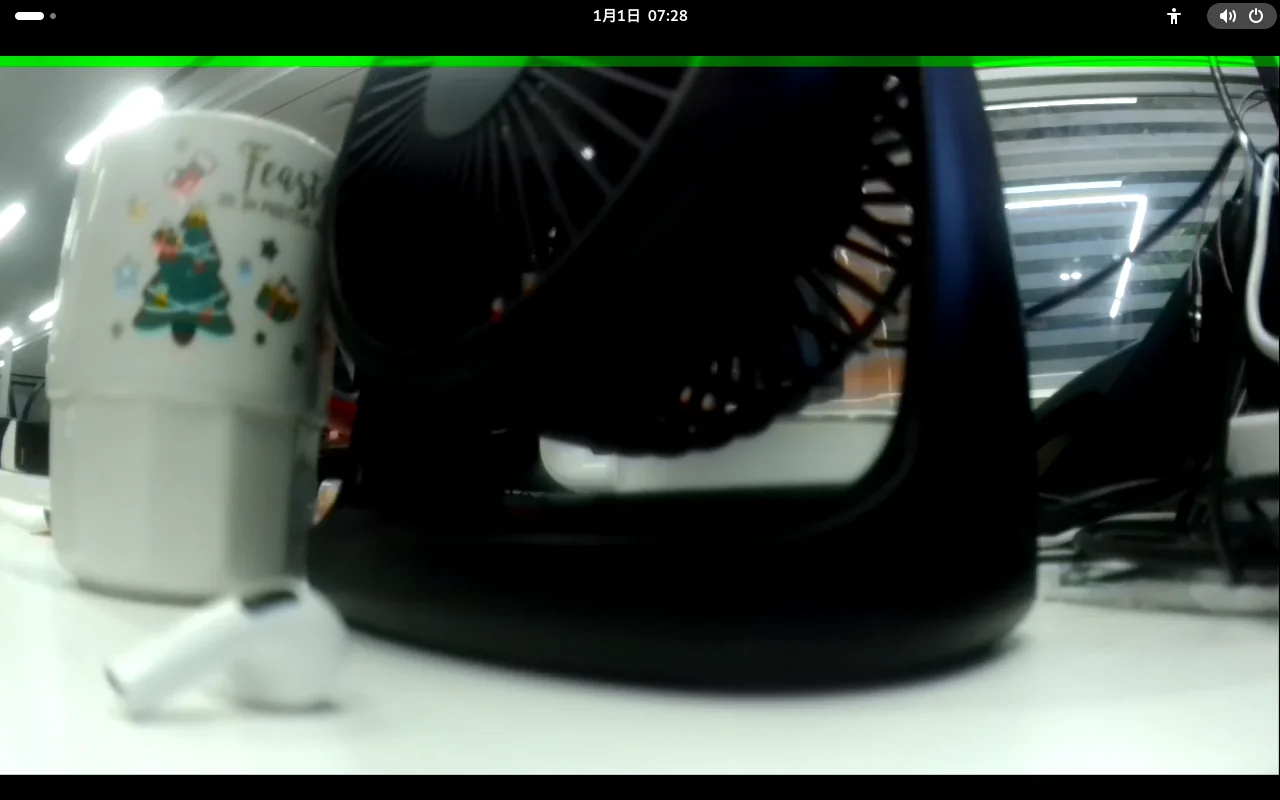
Preview
Run the following command in the device terminal:
gst-launch-1.0 -e qtiqmmfsrc name=camsrc ! 'video/x-raw,format=NV12,width=1280,height=720,framerate=30/1' ! waylandsink
This command starts the camera with a 720p 30 FPS configuration and sends the image to the display for preview. If the GStreamer pipeline state changes to “PLAYING”, the camera is running.
If two cameras are inserted into the two CSI slots at the same time, use camera=0/1 to distinguish them. camera=0 represents the first CSI slot, and camera=1 represents the second CSI slot. For example, to open the camera in the second CSI slot, enter the following command:
gst-launch-1.0 qtiqmmfsrc camera=0 ! 'video/x-raw,format=NV12,width=1920,height=1080,framerate=30/1' ! waylandsink
To stop the camera stream, press CTRL+C.
Video Recording
Run the following command in the device terminal:
gst-launch-1.0 -e qtiqmmfsrc camera=0 \
  ! video/x-raw,format=NV12,width=1280,height=720,framerate=30/1 \
  ! qtic2venc ! h264parse ! mp4mux ! filesink location=/tmp/video.mp4
This command starts the camera with a 720p 30 FPS configuration, encodes the stream as H.264 video, and saves it as a video file. If the GStreamer pipeline state changes to “PLAYING”, the camera is running.
The MP4 file is saved under /tmp/.
To stop camera recording, press CTRL+C.
You can play the video file with the following command:
gst-launch-1.0 filesrc location=/tmp/video.mp4 ! qtdemux name=demux demux.video_0 ! h264parse ! avdec_h264 ! videoconvert ! waylandsink
Photo Capture
Run the following command in the device terminal:
timeout 2 gst-launch-1.0 -e qtiqmmfsrc camera=0 \
  ! video/x-raw,format=NV12,width=1920,height=1080 \
  ! jpegenc ! multifilesink location=/tmp/photo_%d.jpg max-files=1
This command starts the camera with a 1080p 30 FPS configuration, captures an image after a 2-second delay, encodes it as a JPEG image, and saves it as an image file. If the GStreamer pipeline state changes to “PLAYING”, the camera is running.
The image file is saved under /tmp/.
You can view the image file with the following command:
gst-launch-1.0 filesrc location=/tmp/photo_20.jpg ! jpegdec ! imagefreeze ! waylandsink
Dual-Camera Usage
If two cameras are connected and you want to use them at the same time, refer to the following method.
Run the following command in the device terminal:
gst-launch-1.0 \
  compositor name=comp \
    sink_0::xpos=0 sink_0::ypos=0 \
    sink_1::xpos=0 sink_1::ypos=720 \
  ! video/x-raw,width=1280,height=1440 ! waylandsink \
  qtiqmmfsrc camera=0 ! video/x-raw,format=NV12,width=1280,height=720 ! comp.sink_0 \
  qtiqmmfsrc camera=1 ! video/x-raw,format=NV12,width=1280,height=720 ! comp.sink_1
This command starts the cameras with a 720p 30 FPS configuration and previews both camera images at the same time.
To use picture-in-picture mode, run the following command in the terminal:
gst-launch-1.0 \
  compositor name=mix \
    sink_0::xpos=0   sink_0::ypos=0 \
    sink_1::xpos=640 sink_1::ypos=240 \
  ! queue max-size-buffers=3 ! videoconvert ! waylandsink sync=false \
  qtiqmmfsrc camera=0 ! 'video/x-raw,format=NV12,width=1280,height=720,framerate=15/1' ! queue ! mix.sink_0 \
  qtiqmmfsrc camera=1 ! 'video/x-raw,format=NV12,width=640,height=480,framerate=10/1' ! queue ! mix.sink_1
To stop camera recording, press CTRL+C.
M1/L1 Functional Usage (Weston)
Prerequisites:
Before using the camera function, enter the following commands in the terminal:
bash

a=`find /run/user -maxdepth 2 -name 'wayland-?' 2>/dev/null`;
export XDG_RUNTIME_DIR=`dirname $a`
export WAYLAND_DISPLAY=`basename $a`
export LD_PRELOAD=/opt/qcom/lib/libgbm.so:$LD_PRELOAD
Preview
Run the following command in the device terminal:
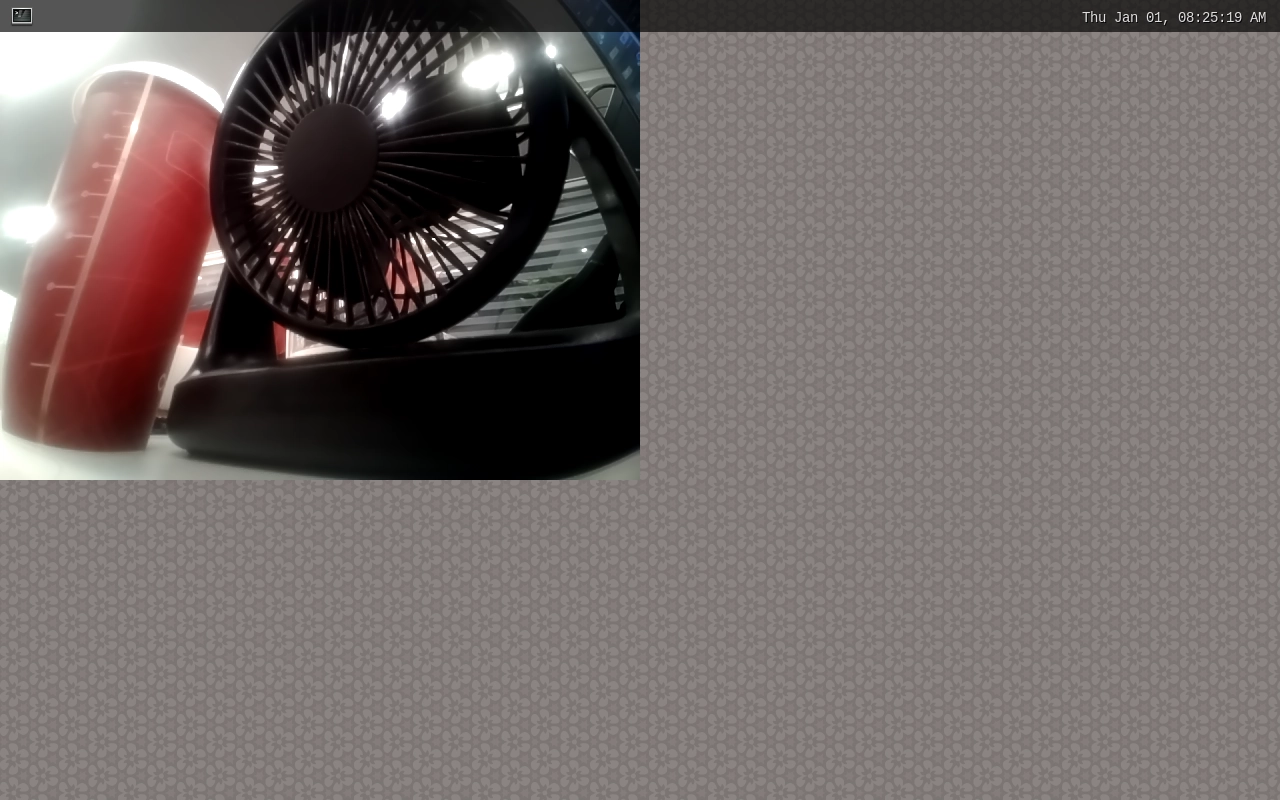
gst-launch-1.0 -e qtiqmmfsrc name=camsrc ! 'video/x-raw,format=NV12,width=1280,height=720,framerate=30/1' ! waylandsink
This command starts the camera with a 720p 30 FPS configuration. You can adjust the resolution according to your needs. The image is sent to the display for preview. If the GStreamer pipeline state changes to “PLAYING”, the camera is running.
If two cameras are inserted into the two CSI slots at the same time, use camera=0/1 to distinguish them. camera=0 represents the first CSI slot, and camera=1 represents the second CSI slot. For example, to open the camera in the second CSI slot, enter the following command:
gst-launch-1.0 qtiqmmfsrc camera=0 ! 'video/x-raw,format=NV12,width=1920,height=1080,framerate=30/1' ! waylandsink
To stop the camera stream, press CTRL+C.
Video Recording
Run the following command in the device terminal:
gst-launch-1.0 -e qtiqmmfsrc camera=0 \
  ! video/x-raw,format=NV12,width=1280,height=720,framerate=30/1 \
  ! qtic2venc ! h264parse ! mp4mux ! filesink location=/tmp/video.mp4
This command starts the camera with a 720p 30 FPS configuration, encodes the stream as H.264 video, and saves it as a video file. If the GStreamer pipeline state changes to “PLAYING”, the camera is running.
The MP4 file is saved under /tmp/.
To stop camera recording, press CTRL+C.
You can play the video file with the following command:
gst-launch-1.0 filesrc location=/tmp/video.mp4 ! qtdemux name=demux demux.video_0 ! h264parse ! avdec_h264 ! videoconvert ! waylandsink
Photo Capture
Run the following command in the device terminal:
timeout 2 gst-launch-1.0 -e qtiqmmfsrc camera=0 \
  ! video/x-raw,format=NV12,width=1920,height=1080 \
  ! jpegenc ! multifilesink location=/tmp/photo_%d.jpg max-files=1
This command starts the camera with a 1080p 30 FPS configuration, captures an image after a 2-second delay, encodes it as a JPEG image, and saves it as an image file. If the GStreamer pipeline state changes to “PLAYING”, the camera is running.
The image file is saved under /tmp/.
You can view the newly generated image file with the following command. For example, the generated image name in this example is photo_20.jpg:
gst-launch-1.0 filesrc location=/tmp/photo_20.jpg ! jpegdec ! imagefreeze ! waylandsink
Dual-Camera Usage
If two cameras are connected and you want to use them at the same time, refer to the following method.
Run the following command in the device terminal:
gst-launch-1.0 \
  compositor name=comp \
    sink_0::xpos=0 sink_0::ypos=0 \
    sink_1::xpos=0 sink_1::ypos=720 \
  ! video/x-raw,width=1280,height=1440 ! waylandsink \
  qtiqmmfsrc camera=0 ! video/x-raw,format=NV12,width=1280,height=720 ! comp.sink_0 \
  qtiqmmfsrc camera=1 ! video/x-raw,format=NV12,width=1280,height=720 ! comp.sink_1
This command starts the cameras with a 720p 30 FPS configuration and previews both camera images at the same time.
To use picture-in-picture mode, run the following command in the terminal:
gst-launch-1.0 \
  compositor name=mix \
    sink_0::xpos=0   sink_0::ypos=0 \
    sink_1::xpos=640 sink_1::ypos=240 \
  ! queue max-size-buffers=3 ! videoconvert ! waylandsink sync=false \
  qtiqmmfsrc camera=0 ! 'video/x-raw,format=NV12,width=1280,height=720,framerate=15/1' ! queue ! mix.sink_0 \
  qtiqmmfsrc camera=1 ! 'video/x-raw,format=NV12,width=640,height=480,framerate=10/1' ! queue ! mix.sink_1
To stop camera recording, press CTRL+C.